
There’s something truly magical about St Patrick’s Day. It’s a day when the world collectively embraces a little bit of joy, a vibrant splash of green, and the promise of spring. For many of us, it’s also an excuse to get creative in the kitchen, especially when it comes to festive treats. Forget the elaborate dinners for a moment, because today we’re diving into the delightful world of decorating. And trust me, once you try your hand at these, you’ll wonder why you ever hesitated.
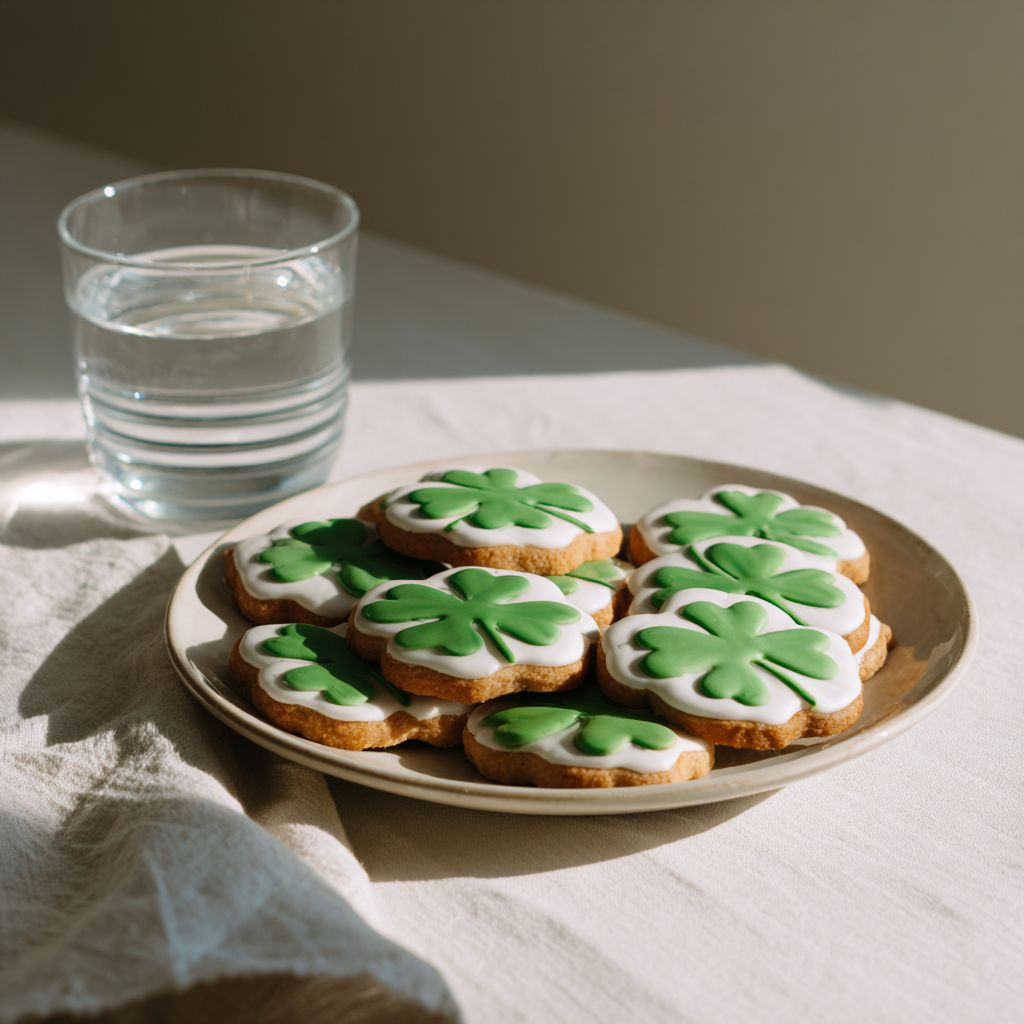
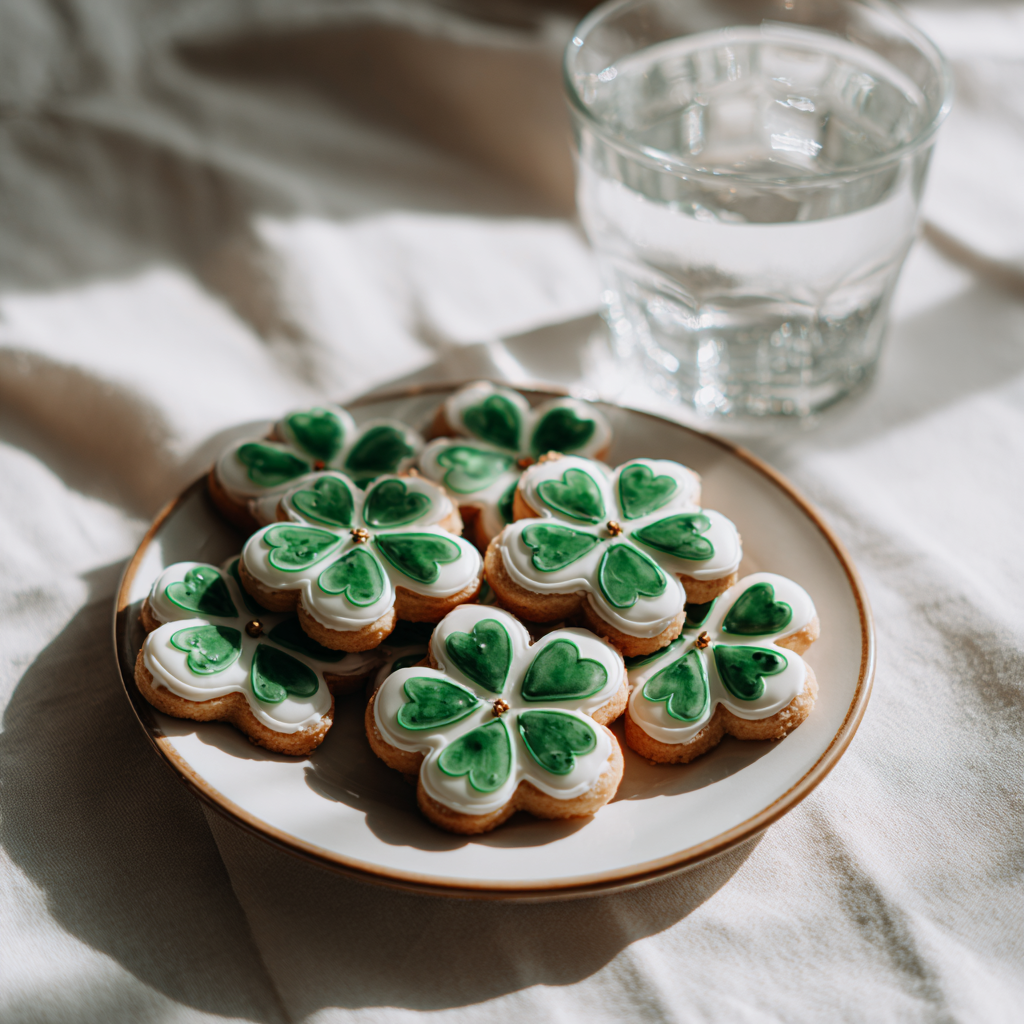
Imagine a spread of perfectly shaped cookies, each one a miniature canvas, adorned with shades of emerald, gold, and creamy white. These aren’t just any biscuits; these are St Patrick’s Day royal icing cookies, little edible masterpieces that bring a smile to every face. They’re the perfect pick-me-up for a dull afternoon, a thoughtful gift for a friend, or perhaps the star of your St Patrick’s Day celebration. Making these cookies is more than just baking; it’s an act of cheerful creation.
The beauty of royal icing lies in its versatility and its ability to transform a simple sugar biscuit into something truly special. It dries to a hard, smooth finish, preserving your beautiful designs and making them perfect for gifting or stacking. Whether you’re a seasoned decorator or just starting out, this guide for St Patrick’s Day royal icing cookies will walk you through the process, making it enjoyable and surprisingly simple. Get ready to add a touch of Irish charm to your baking!
Why You’ll Love This Recipe
There are so many reasons to fall head over heels for these St Patrick’s Day royal icing cookies. Firstly, they’re incredibly festive and instantly put you in a celebratory mood. The vibrant green and gold hues are simply irresistible. Beyond their appearance, though, this recipe is designed for maximum enjoyment and minimum fuss. You’ll find that making your own royal icing is far more approachable than you might think, opening up a whole new world of cookie decorating possibilities. It’s also an excellent activity for getting the whole family involved, creating edible art together.
These cookies aren’t just pretty faces; they taste absolutely delicious too! The crisp sugar biscuit pairs perfectly with the sweet, smooth royal icing, creating a delightful texture and flavour combination. Plus, because royal icing sets firm, these St Patrick’s Day royal icing cookies are ideal for preparing in advance, making them a stress-free addition to any gathering. They also make fantastic gifts, carefully packaged and shared with loved ones. It’s a sure-fire way to spread a little bit of St Patrick’s Day cheer, one beautifully decorated biscuit at a time.
Ingredients You’ll Need
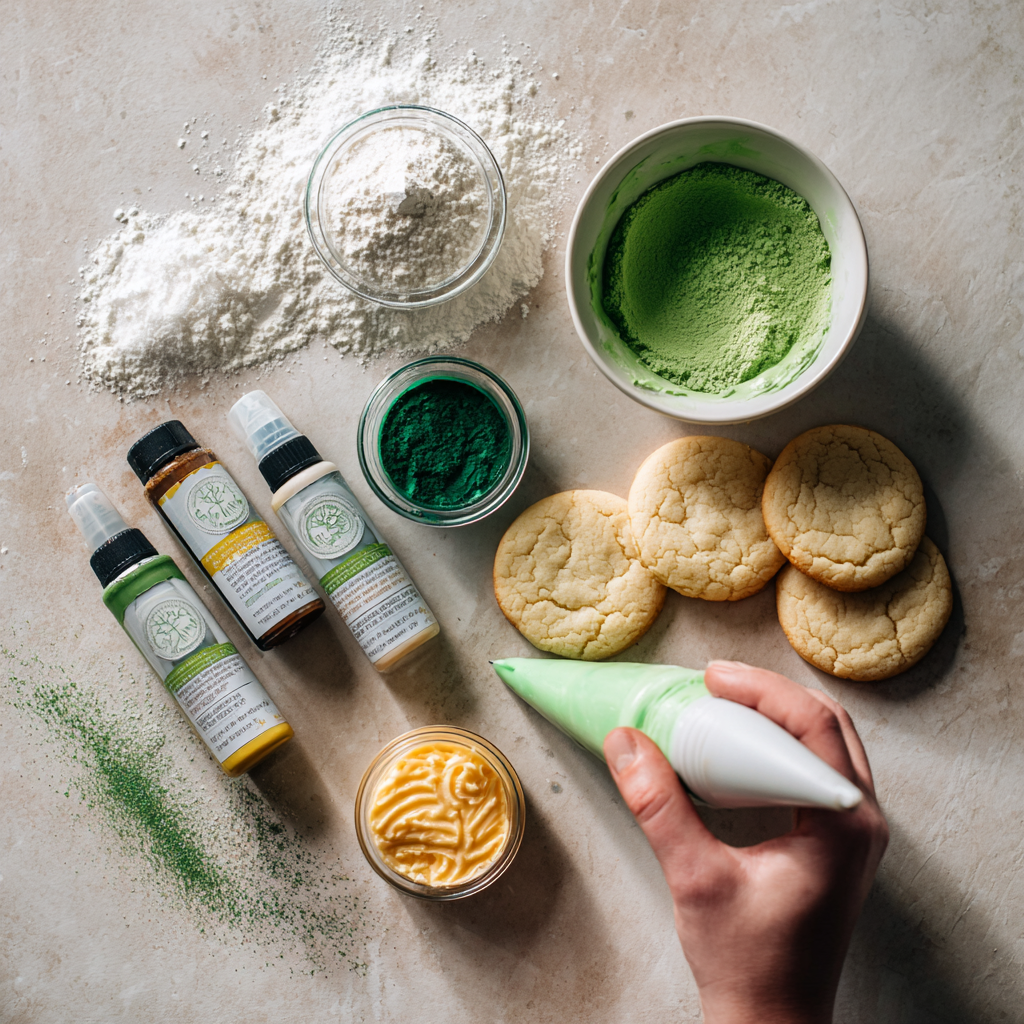
Creating showstopping St Patrick’s Day royal icing cookies starts with a few key ingredients. You’ll need a batch of your favourite sugar cookies, baked and completely cooled – this is crucial for flawless decorating. For the icing itself, we’re keeping it simple and effective. The magic really happens with powdered sugar, which forms the base, and meringue powder, which gives the icing its incredible structure and quick-drying properties. A little warm water brings it all together, and then it’s just a matter of adding colour with green and yellow gel food colouring. These concentrated colours give you vibrant results without thinning the icing.
How to Make St Patrick’s Day Royal Icing Cookies: Easy & Festive Decorations
Getting started with your St Patrick’s Day royal icing cookies is surprisingly straightforward. The first step involves whisking together your powdered sugar and meringue powder. This ensures there are no lumps, which is essential for a smooth icing. Next, you’ll gradually incorporate warm water, mixing on a low speed initially to combine everything. The real transformation happens when you increase the speed and beat the mixture for several minutes until stiff peaks form. This indicates your royal icing has reached the perfect consistency, ready to hold its shape beautifully on your St Patrick’s Day royal icing cookies.
With your base icing ready, it’s time to add that iconic St Patrick’s Day colour. Divide your perfectly prepared icing into three separate bowls. In one, you’ll add green gel food colouring, mixing until you achieve your desired shade – think shamrocks and lush Irish landscapes. In another, introduce a few drops of yellow for a touch of gold or sunshine. The third bowl remains pure white, offering a lovely contrast. Then, transfer each coloured icing into separate piping bags fitted with small round tips. This allows for precise outlining and flooding of your cookie designs, bringing your St Patrick’s Day royal icing cookies to life. Remember to let your decorated cookies dry completely for several hours, or even overnight, to ensure the icing sets perfectly.
Recipe Tips and Notes
- Consistency is Key: Royal icing consistency is crucial. For outlining, you want it a bit thicker, like toothpaste. For flooding, it should be thinner, like honey, so it can spread smoothly. You can adjust with tiny drops of water for thinner icing or a little more powdered sugar for thicker.
- Start with Cooled Cookies: Always ensure your sugar cookies are completely cooled before you start decorating. Warm cookies will melt the icing and ruin your designs.
- Use Gel Food Colouring: Gel colours are highly concentrated, meaning you need less to achieve vibrant shades without thinning your icing too much. Liquid food colourings can alter consistency.
- Cover Unused Icing: Royal icing dries quickly when exposed to air. Always keep any icing not currently in use covered with a damp cloth or cling film directly touching the surface to prevent it from crusting over.
- Patience is a Virtue: Allow ample drying time between different coloured sections if your designs overlap. This prevents colours from bleeding into each other. For best results, let St Patrick’s Day royal icing cookies dry overnight.
Make Ahead Tips
One of the best things about making St Patrick’s Day royal icing cookies is how well they can be prepared in advance. You can bake your sugar cookies several days ahead of time, storing them in an airtight container at room temperature. This breaks down the task into manageable steps. The royal icing itself can also be made a day or two in advance. Store it in an airtight container in the fridge, with cling film pressed directly onto the surface to prevent a crust forming. Before using, give it a good stir on low speed with a mixer to bring it back to life, adding a tiny drop of water if it’s too thick.
Once your St Patrick’s Day royal icing cookies are fully decorated and completely dry, they store beautifully. Layer them between sheets of baking parchment in an airtight container. They will remain fresh and delicious for up to a week at room temperature, making them ideal for gifting or serving at a party without any last-minute rush. This forward planning ensures your St Patrick’s Day celebrations are as stress-free and enjoyable as possible, leaving you more time to enjoy your beautifully crafted treats, perhaps alongside some classic shortbread for a varied treat plate.
Variations
While classic green, yellow, and white St Patrick’s Day royal icing cookies are delightful, there are countless ways to get creative with your designs and colours. Consider adding a touch of edible glitter or gold dust to your wet icing for extra sparkle, especially for those ‘pot of gold’ vibes. You could also experiment with different piping tips to create more intricate details like intricate shamrock patterns or delicate lace effects. Using various shades of green, from light lime to deep forest, can add wonderful depth to your cookie display. For those who enjoy a bit more flair, try marbling techniques by swirling different colours together before the icing sets.
Beyond the simple flood and outline, consider adding details with edible markers once the base icing is dry, perfect for drawing intricate patterns or adding text. If you want to expand your St Patrick’s Day offerings, you could also try using this royal icing recipe to decorate other shaped biscuits, not just traditional rounds or squares. Think about sheep outlines, leprechaun hats, or even pots of gold. These variations keep the decorating fun and fresh, ensuring your St Patrick’s Day royal icing cookies are always a hit and encourage you to explore other festive bakes, like a batch of vibrant red velvet cupcakes.
Serving Suggestions
These St Patrick’s Day royal icing cookies are true stars on their own, but they also make wonderful companions to a variety of other treats and drinks. They are absolutely perfect served alongside a mug of freshly brewed tea or coffee, offering a sweet and festive pick-me-up. For a St Patrick’s Day party, arrange them artfully on a platter with other green-themed snacks, like pistachio macarons or lime jellies, to create a stunning visual spread. They also pair wonderfully with a simple bowl of fresh berries, providing a colourful contrast.
If you’re looking to elevate the experience, consider serving your St Patrick’s Day royal icing cookies as part of a dessert buffet. Their firm texture makes them easy to handle, and their beautiful designs add an elegant touch. They can also be a delightful finish to a comforting meal, a small sweet treat after a hearty stew. For an interactive element, set up a “decorating station” for guests with plain cookies and pre-made icing in piping bags, allowing everyone to get creative. And don’t forget, these St Patrick’s Day royal icing cookies are absolutely fantastic as edible gifts, tied up with a festive ribbon!
Frequently Asked Questions
How long do St Patrick’s Day royal icing cookies take to dry?
For St Patrick’s Day royal icing cookies to dry completely, plan for several hours, ideally overnight. The drying time can vary depending on humidity, the thickness of your icing, and the size of your cookies. It’s crucial to ensure they are fully dry before stacking or packaging to prevent smudging. A good test is to gently touch a hidden part of the icing; if it’s firm and not tacky, it’s dry.
Can I make royal icing without meringue powder?
While meringue powder is highly recommended for its stability and quick-drying properties, you can make royal icing using fresh egg whites. If using fresh egg whites for your St Patrick’s Day royal icing cookies, ensure they are pasteurised for safety. Use approximately one large egg white per 2 cups of powdered sugar, adjusting with water for consistency. However, meringue powder offers a more consistent and reliable result.
How do I store leftover St Patrick’s Day royal icing?
To store leftover royal icing, transfer it to an airtight container. Place a piece of cling film directly on the surface of the icing to prevent a crust from forming, then seal the container. It can be stored in the refrigerator for up to two weeks. Before using again, let it come to room temperature and stir gently, adding a tiny bit of water if it has thickened too much.
Why is my St Patrick’s Day royal icing not drying properly?
Several factors can cause your St Patrick’s Day royal icing to not dry properly. High humidity is a common culprit, as moisture in the air can significantly slow down drying time. Using too much liquid food colouring can also thin the icing excessively, preventing it from setting firm. Ensure you are using meringue powder, as it helps with drying, and always allow ample time for the cookies to air dry in a cool, dry environment.
Can I freeze decorated St Patrick’s Day royal icing cookies?
Yes, you can freeze St Patrick’s Day royal icing cookies once they are completely dry. Place them in a single layer in an airtight container, separating layers with baking parchment. Freeze for up to three months. When you’re ready to enjoy them, thaw them overnight in the refrigerator, then bring them to room temperature before serving. Be aware that extreme temperature changes can sometimes cause condensation, which might slightly affect the sheen of the icing, but they will still taste delicious.
As we wrap up our delightful journey into crafting St Patrick’s Day royal icing cookies, I hope you feel inspired and ready to get your hands a little messy in the best possible way. There’s a unique satisfaction that comes from creating something both beautiful and delicious, and these festive biscuits truly deliver on both fronts. Whether you’re a seasoned baker or just dipping your toes into the world of cookie decorating, the process of making these cookies is incredibly rewarding. From the initial mixing of the vibrant ingredients to the meticulous outlining and flooding, every step is a chance to infuse a little bit of joy and creativity into your day.
These St Patrick’s Day royal icing cookies are more than just a treat; they’re a celebration of tradition, a nod to craftsmanship, and a perfect way to share some Irish cheer with those you love. Imagine the smiles when you present a tray of these emerald and gold beauties, each one a miniature work of art. They’re perfect for school parties, office gatherings, or simply as a comforting snack with a cup of tea on a crisp St Patrick’s Day afternoon. The effort you put into each cookie is reflected in the delighted faces of those who enjoy them, making every moment spent in the kitchen utterly worthwhile.
So, gather your supplies, put on some cheerful music, and let your imagination take the lead. Don’t be afraid to experiment with different shades of green or add a touch of edible glitter for extra sparkle. Remember, practice makes perfect, but even imperfectly decorated cookies taste absolutely divine! These St Patrick’s Day royal icing cookies are a testament to the simple pleasures of baking and sharing. They encourage us to slow down, enjoy the process, and create edible memories. Here’s to a St Patrick’s Day filled with delicious treats and warm, happy moments!
Print
st patricks day royal icing cookies
- Total Time: 30 minutes (plus cooling and drying time)
- Yield: Depends on the number of cookies in your batch
- Diet: Vegetarian
Description
Get ready to shamrock and roll with these delightful St. Patrick’s Day Royal Icing Cookies! Perfect for celebrating the luck of the Irish, these festive treats are not only fun to decorate but also incredibly delicious. With a crisp sugar cookie base and a vibrant royal icing finish, they’re sure to bring a touch of green magic to your celebration. Whether you’re a seasoned decorator or just starting out, this recipe will guide you to create beautiful and tasty cookies that everyone will adore.
Ingredients
- 1 batch sugar cookies, baked and cooled
- 4 cups powdered sugar
- 3 tablespoons meringue powder
- 6 tablespoons warm water
- Green gel food coloring
- Yellow gel food coloring
Instructions
- In a large bowl, whisk together powdered sugar and meringue powder.
- Gradually add warm water, mixing on low speed until combined.
- Increase speed to high and beat for 5-7 minutes, until stiff peaks form.
- Divide icing into three bowls.
- In the first bowl, add a few drops of green food coloring and mix well.
- In the second bowl, add a few drops of yellow food coloring and mix well.
- Leave the third bowl white.
- Transfer icings to separate piping bags with small round tips.
- Outline and flood cookies with desired green, yellow, and white icing designs.
- Let cookies dry completely for several hours or overnight.
Notes
- For best results, ensure your sugar cookies are completely cooled before decorating.
- Adjust the amount of water to achieve desired icing consistency. For outlining, you’ll want a slightly thicker consistency, and for flooding, a bit thinner.
- If your icing starts to set in the piping bag, knead it gently to re-soften, or add a tiny drop of water if needed.
- Clean your piping tips regularly to prevent clogging, especially when working with different colors.
- Prep Time: 30 minutes
- Cook Time: 0 minutes
- Category: Dessert
- Method: Baking, Decorating
- Cuisine: Irish-American